

👉🏻 Settings
👉🏻 Waiter
👉🏻 Interface
👉🏻 Additions
Download the plugin 👉🏻 download
The plugin is compatible with iikoFront versions 8.0 and above.
To work with an external loyalty system, you need to purchase the iikoFrontPaymentPlugin license.
Settings
Step 1. Download and run the file
or
Step 1. Extract the archive containing the plugin build

Create a new folder named MCRM and place the files from the archive into it.
The folder must be named exactly MCRM, without any additional characters.
Step 2. First launch of iikoFront
· Launch Front.
· Wait for the message "MCRM: Authorization error. Plugin not started".
· Close Front.
· Wait for the message "MCRM: Authorization error. Plugin not started".
· Close Front.
At this step, the plugin creates a configuration file.
Step 3. Editing the configuration file
CRM_url / CRM_apikey / CRM_oauth_key can be configured from the iiko front as well. For more details, see the appendices.
or enter the data into the config file:
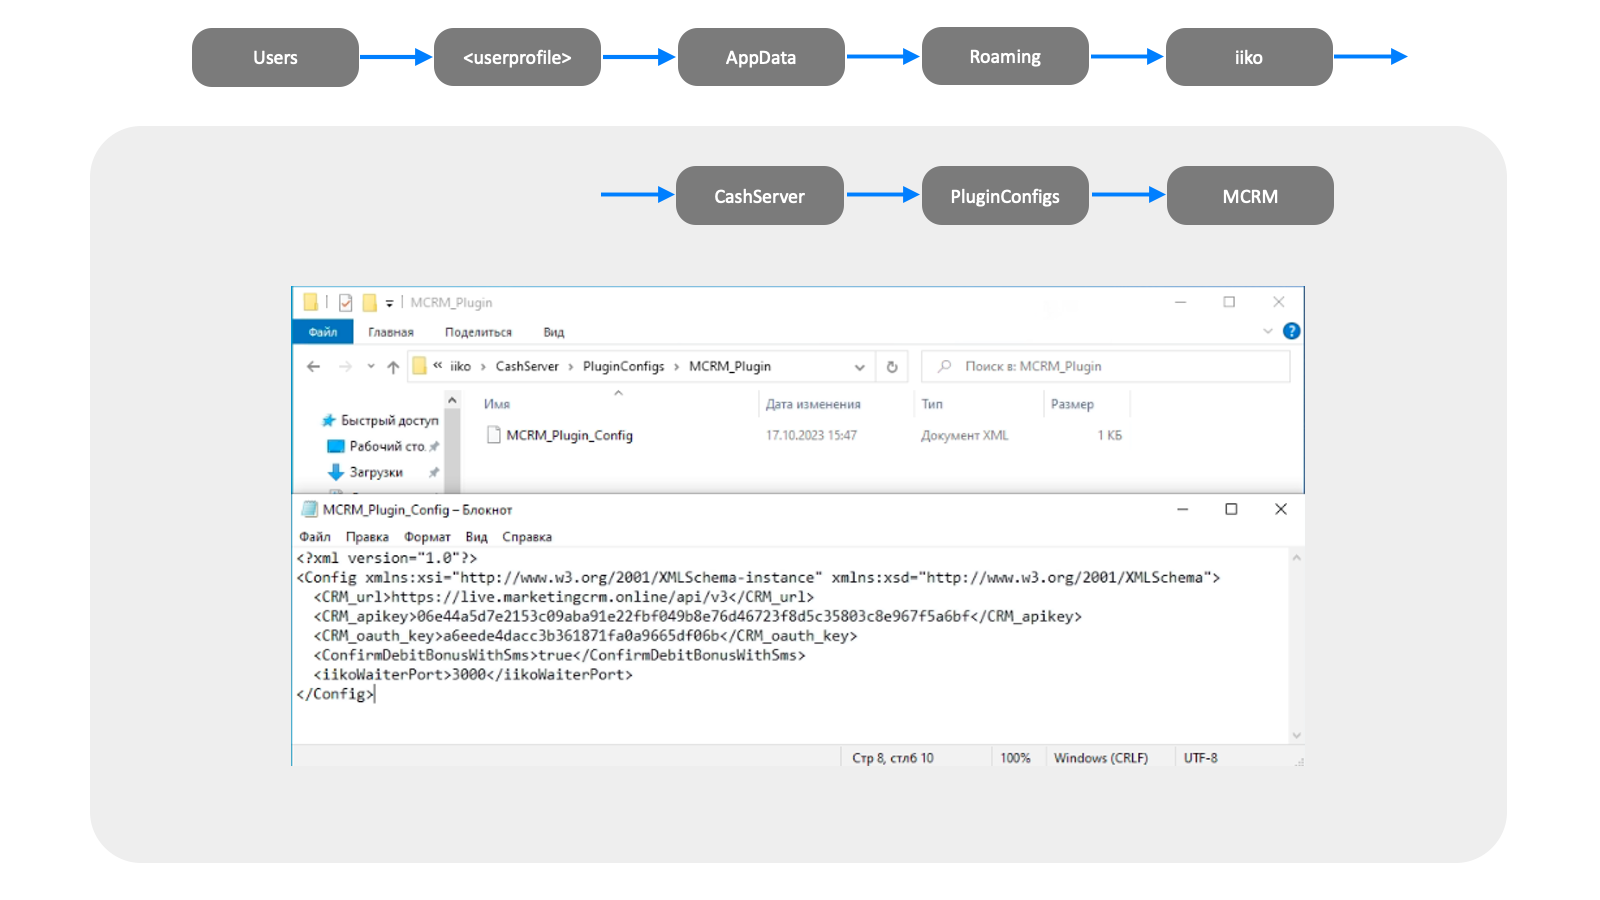
Open the plugin config MCRM_Plugin_Config.xml and enter the connection data.
MCRM_Plugin_Config.xml
CRM_url - server address
CRM_apikey - enterprise token
CRM_oauth_key - enterprise token for registering clients from Front
- these data must be obtained from an MCRM employee
ConfirmDebitBonusWithSms - parameter for enabling the authorization of bonus deduction via SMS code:
true - send the code via SMS
false - deduct without authorization
iikoWaiterPort - the port on which the plugin will listen for Waiter
InterceptCardRoll - parameter responsible for intercepting the scanned card:
true - by default, the scanned card is automatically intercepted by the MCRM plugin
false - to disable interception, if needed. In this configuration, the MCRM plugin button in the order must be used to authorize the guest.
Step 4. Create a discount
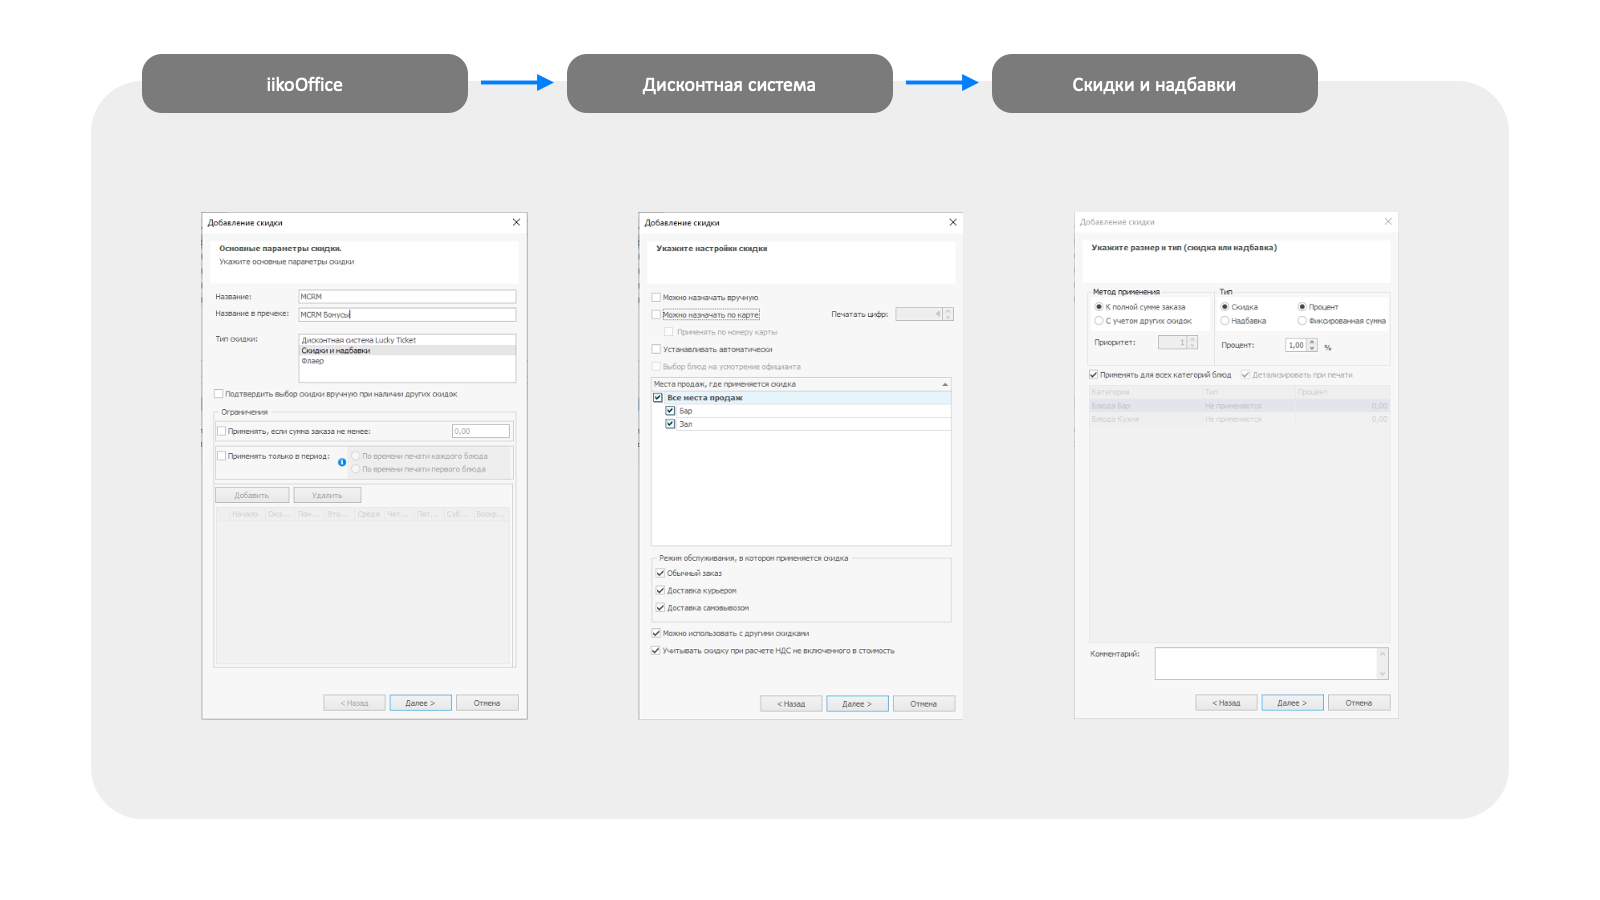
Create a discount as shown in the screenshot:
- uncheck the boxes "Can be assigned manually" and "Can be assigned by card";
- set a 1% discount on the entire menu.
Step 5. Set up an external payment type
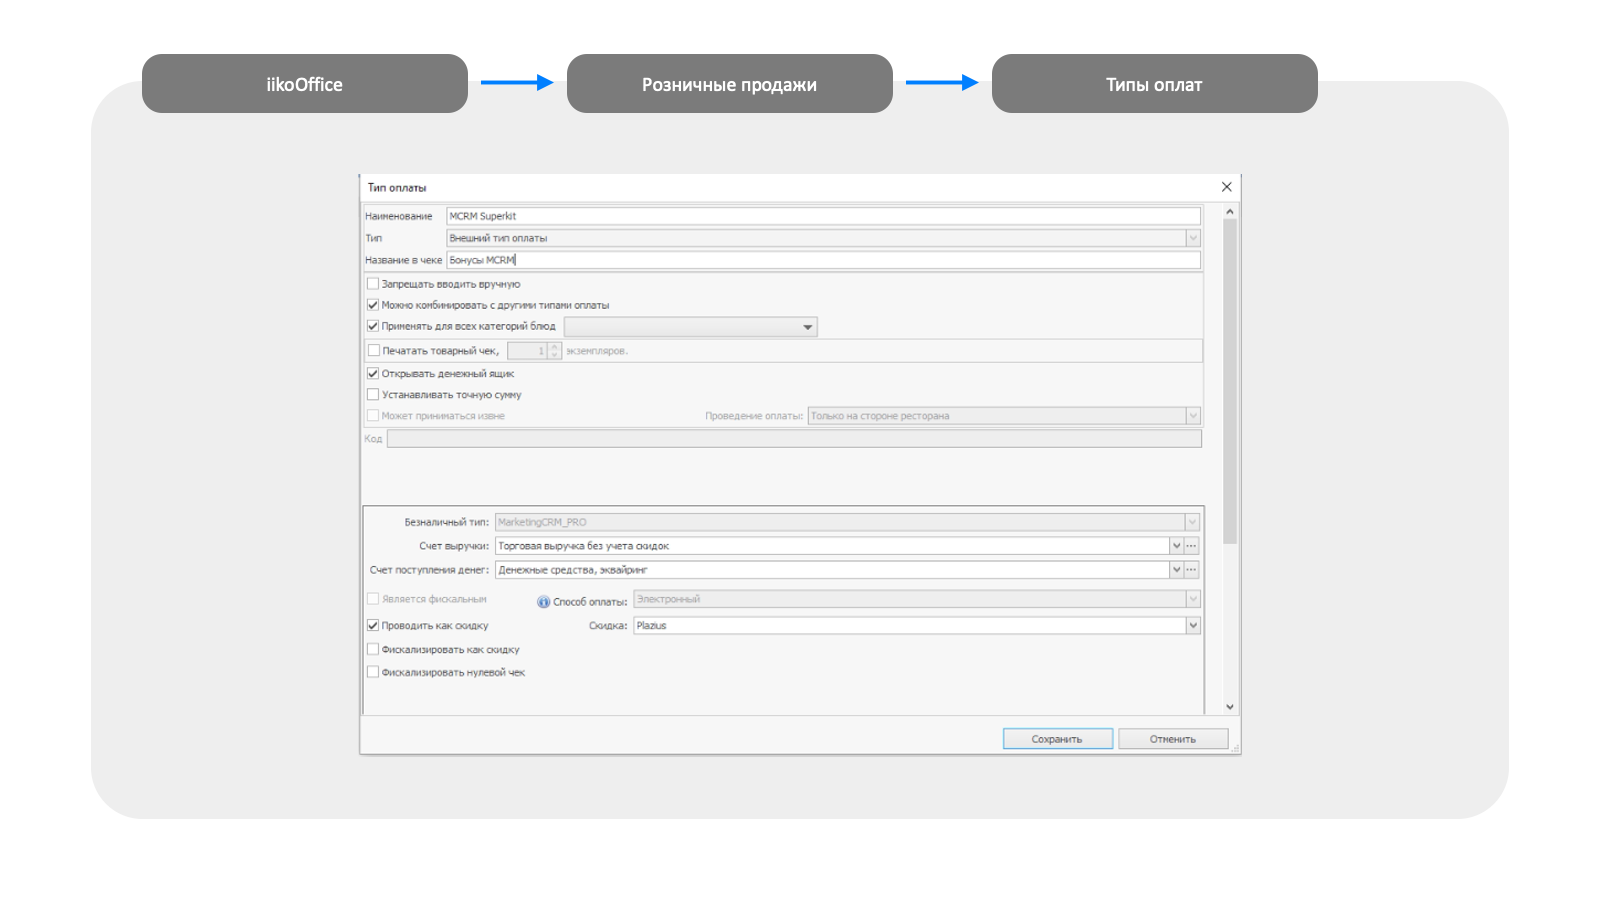
Create a payment type as shown in the screenshot:
- in the "Cashless Type" field, make sure to select "MarketingCRM_Pro." If this option is not available in the list, return to step 2. This type is registered when Front is launched for the first time;
- check the box "Treat as a discount" and select the discount from Step 4 (or Plazius).
Step 6. Run Front as Administrator

Done! The plugin is configured and ready to use.
Waiter
Let's set up the integration with iikoWaiter.

· Edit the configuration file WaiterServerConfig.json.
· In the Url field, enter the address of the MCRM plugin (the "/" at the end is mandatory): http://localhost:3000/MCRM/
Specify the port that is listed in the MCRM_Plugin_Config.xml file under the iikoWaiterPort parameter (Step 3).
· In the fields BonusPaymentTypeId and DepositPaymentTypeId enter the payment type ID created in Step 5.
The simplest way to obtain the payment type ID for MCRM is to copy it from the MCRM plugin log files.
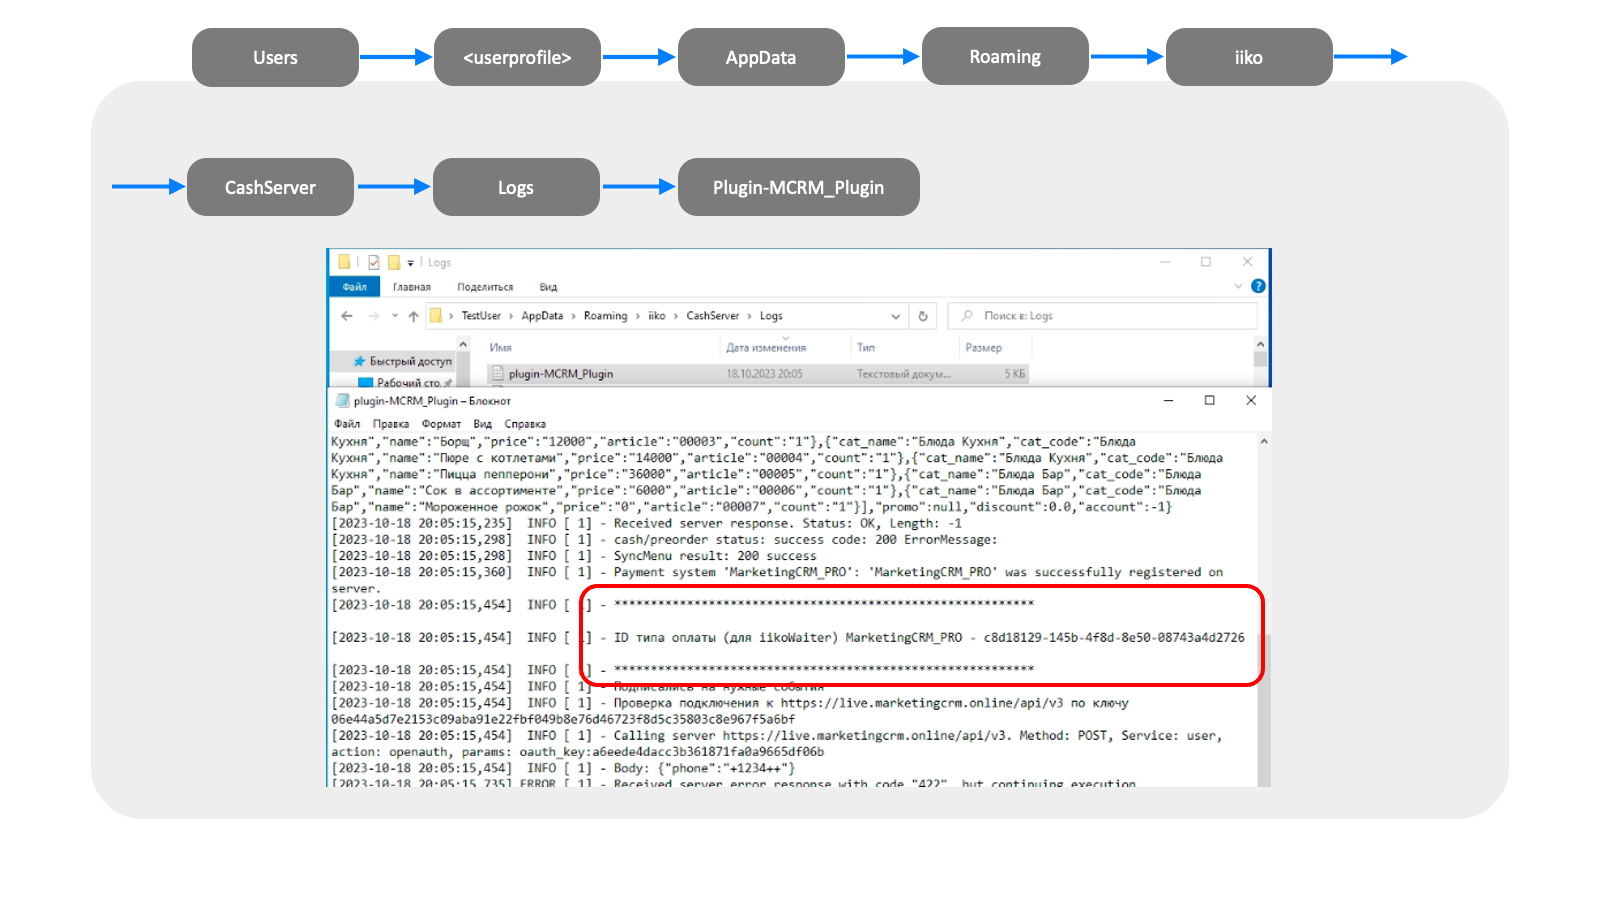
· Save the changes made to the configuration file WaiterServerConfig.json.
Done!
Let's test the connection. In a browser on the computer with iikoFront and the Waiter plugin, open the settings: localhost:8100/settings.
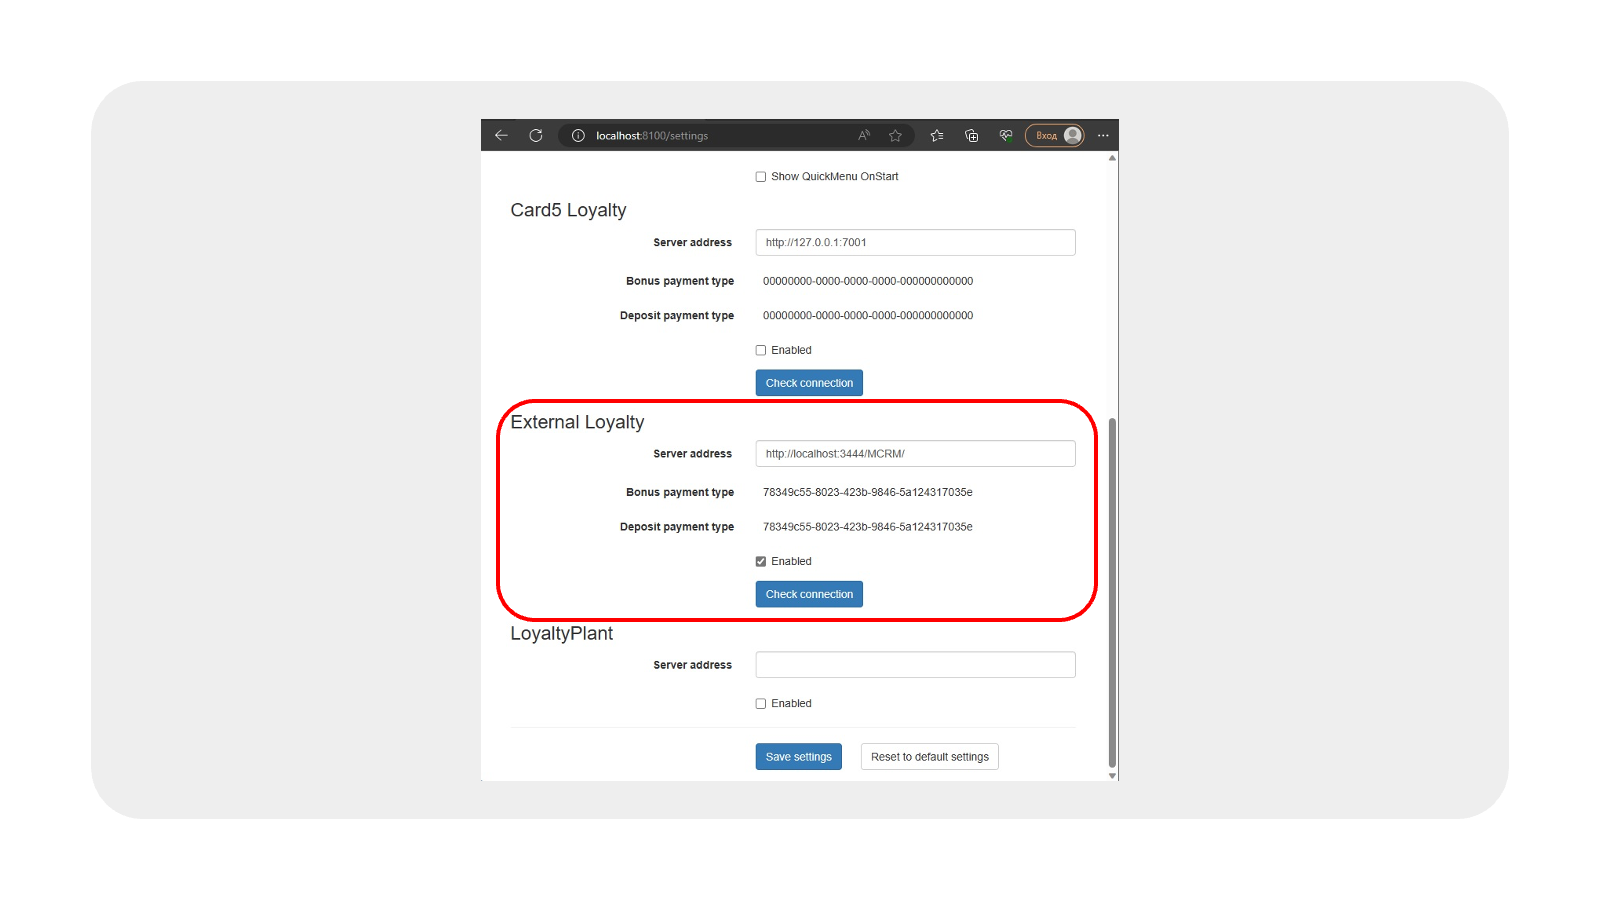
In the External Loyalty section, the data we entered during the iikoWaiter integration setup in the configuration file will be displayed.
- Check the connection (button Check connection).
- You'll see the message:
Message from localhost:8100:
Successfully connected
Interface
Adding a card to the order
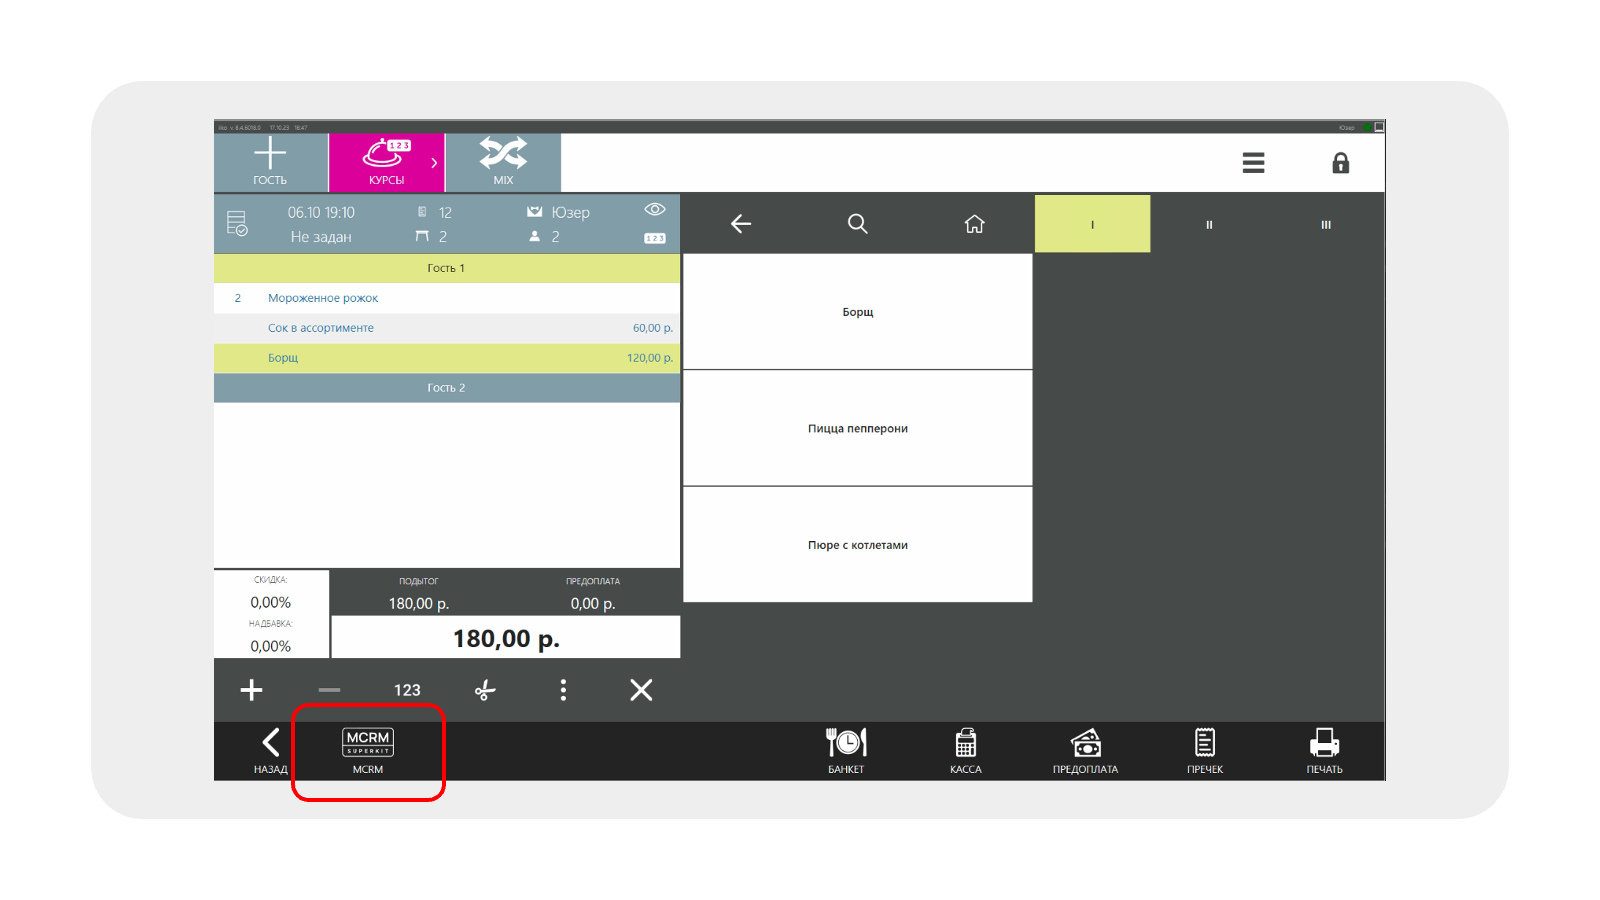
All card operations are performed through the MCRM button in the bottom panel of iikoFront.
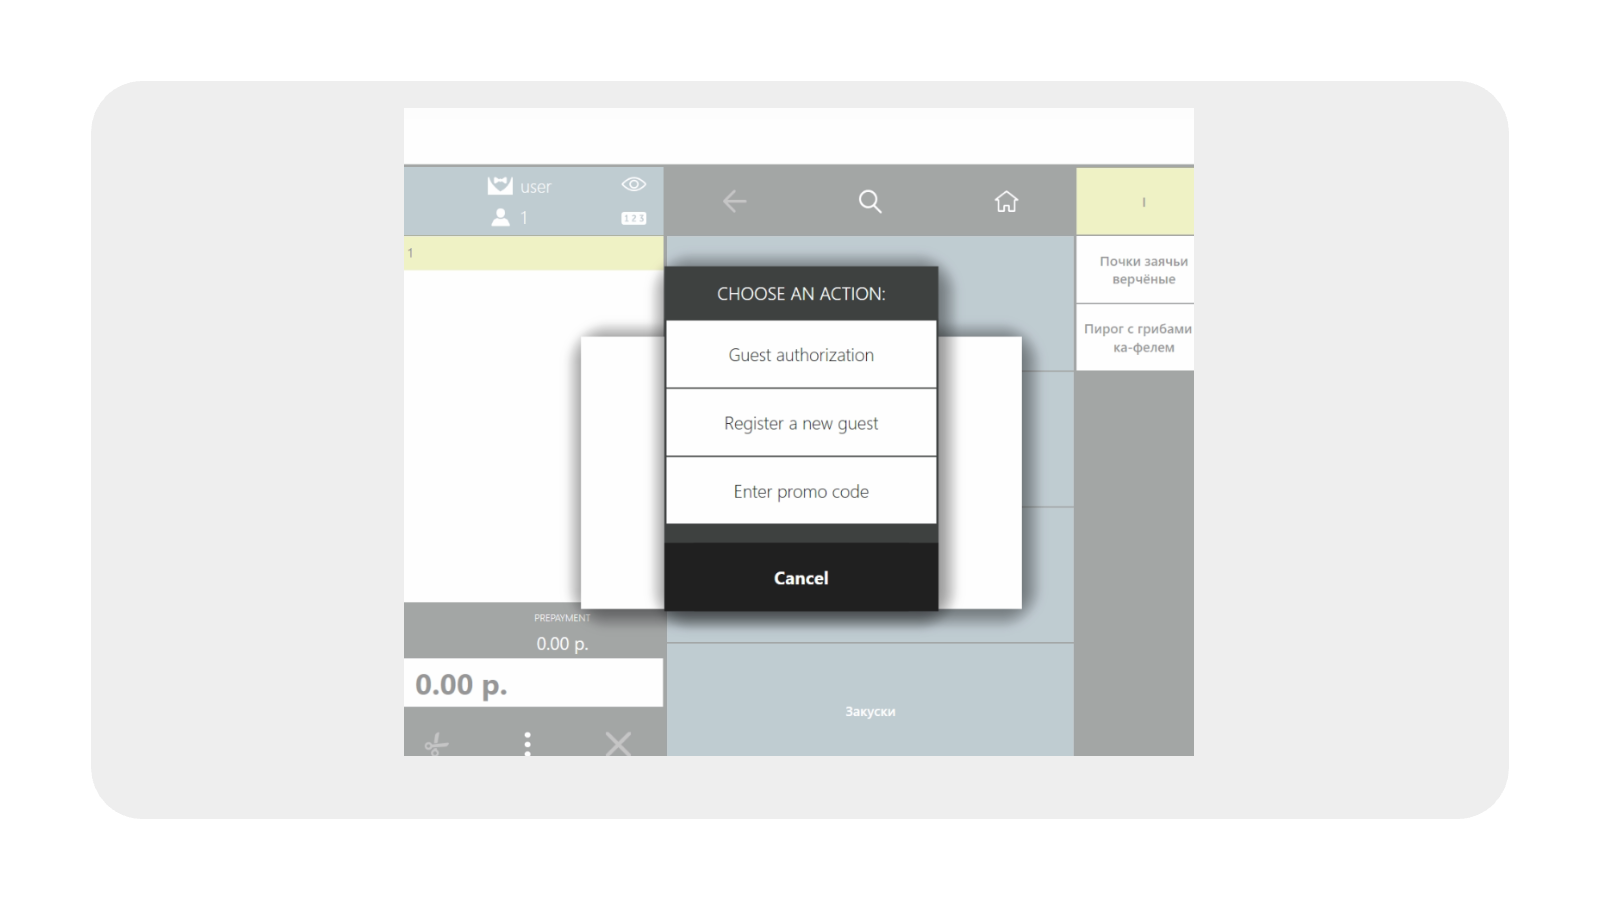
In the modal window, select "Guest Authorization".
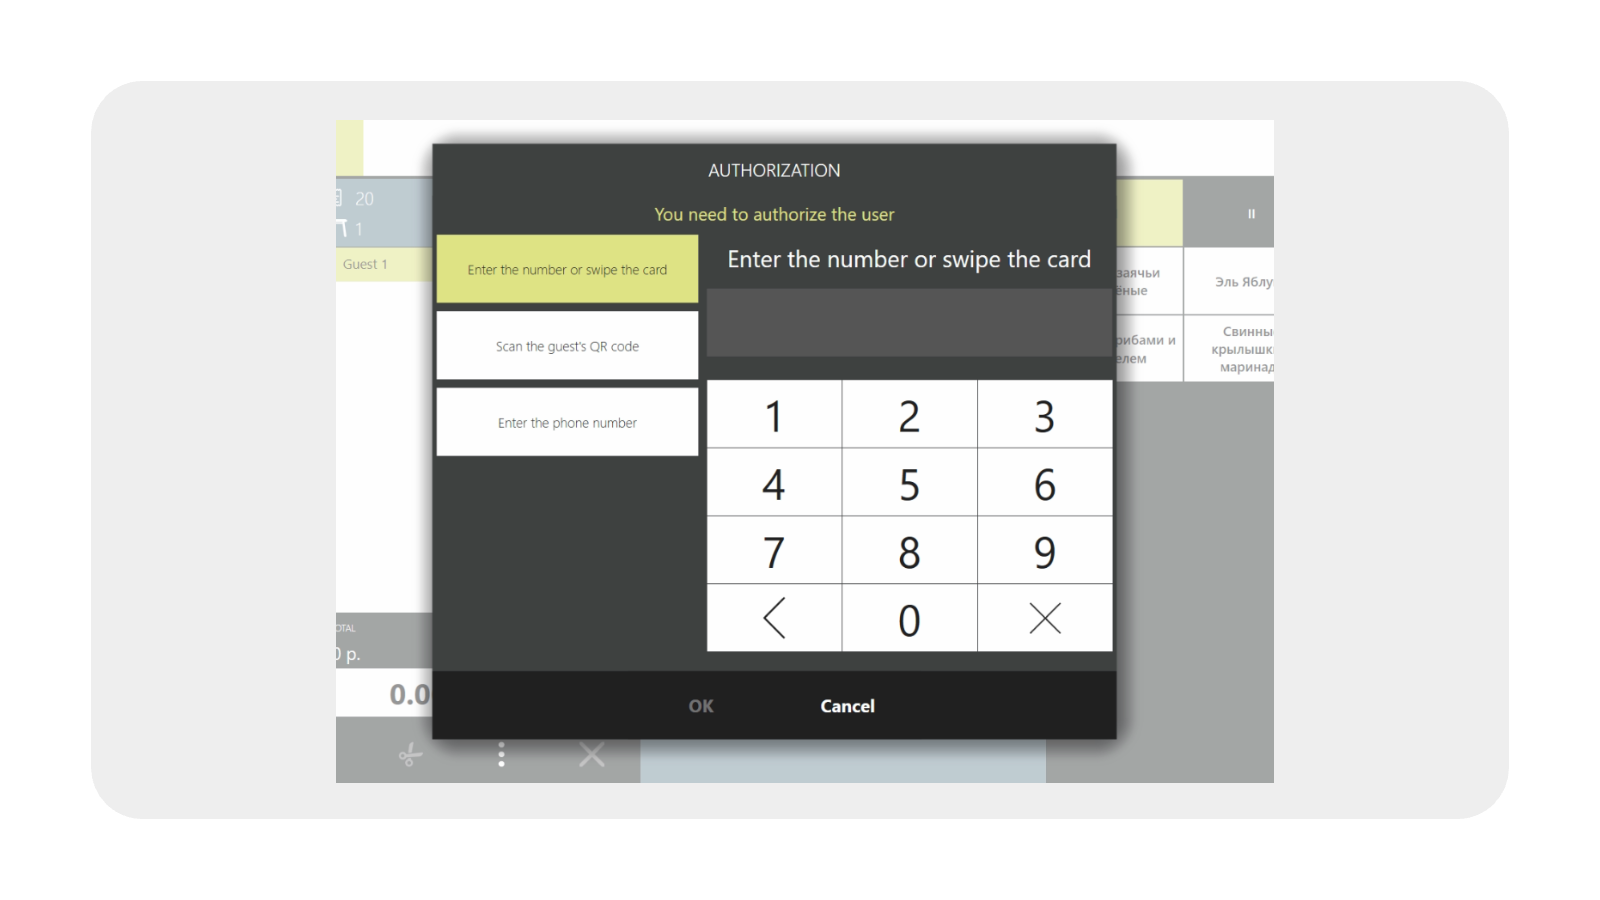
A client can be authorized by:
- card number;
- phone number;
- scanning a QR code.
Immediately after card authorization, modal windows with personal promotions/offers for the guest will appear (if available).
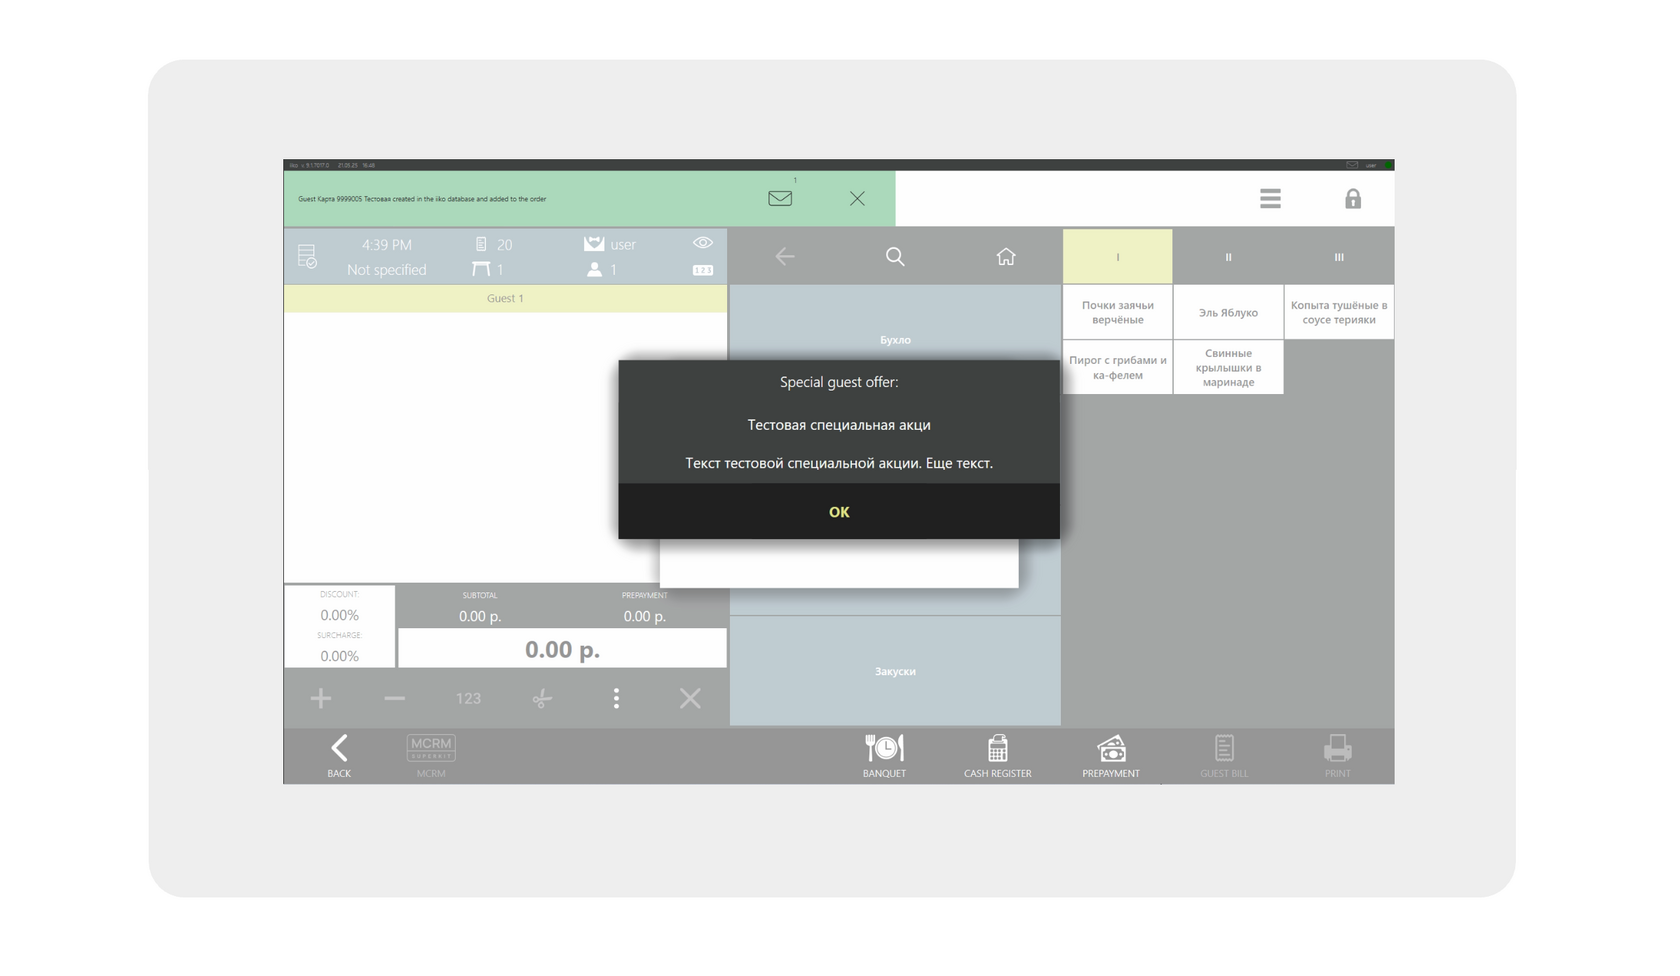
These promotions are duplicated on the pre-check, and the promotion snippet text is printed.
After closing the modal window with the guest's promotions, the main information is displayed.
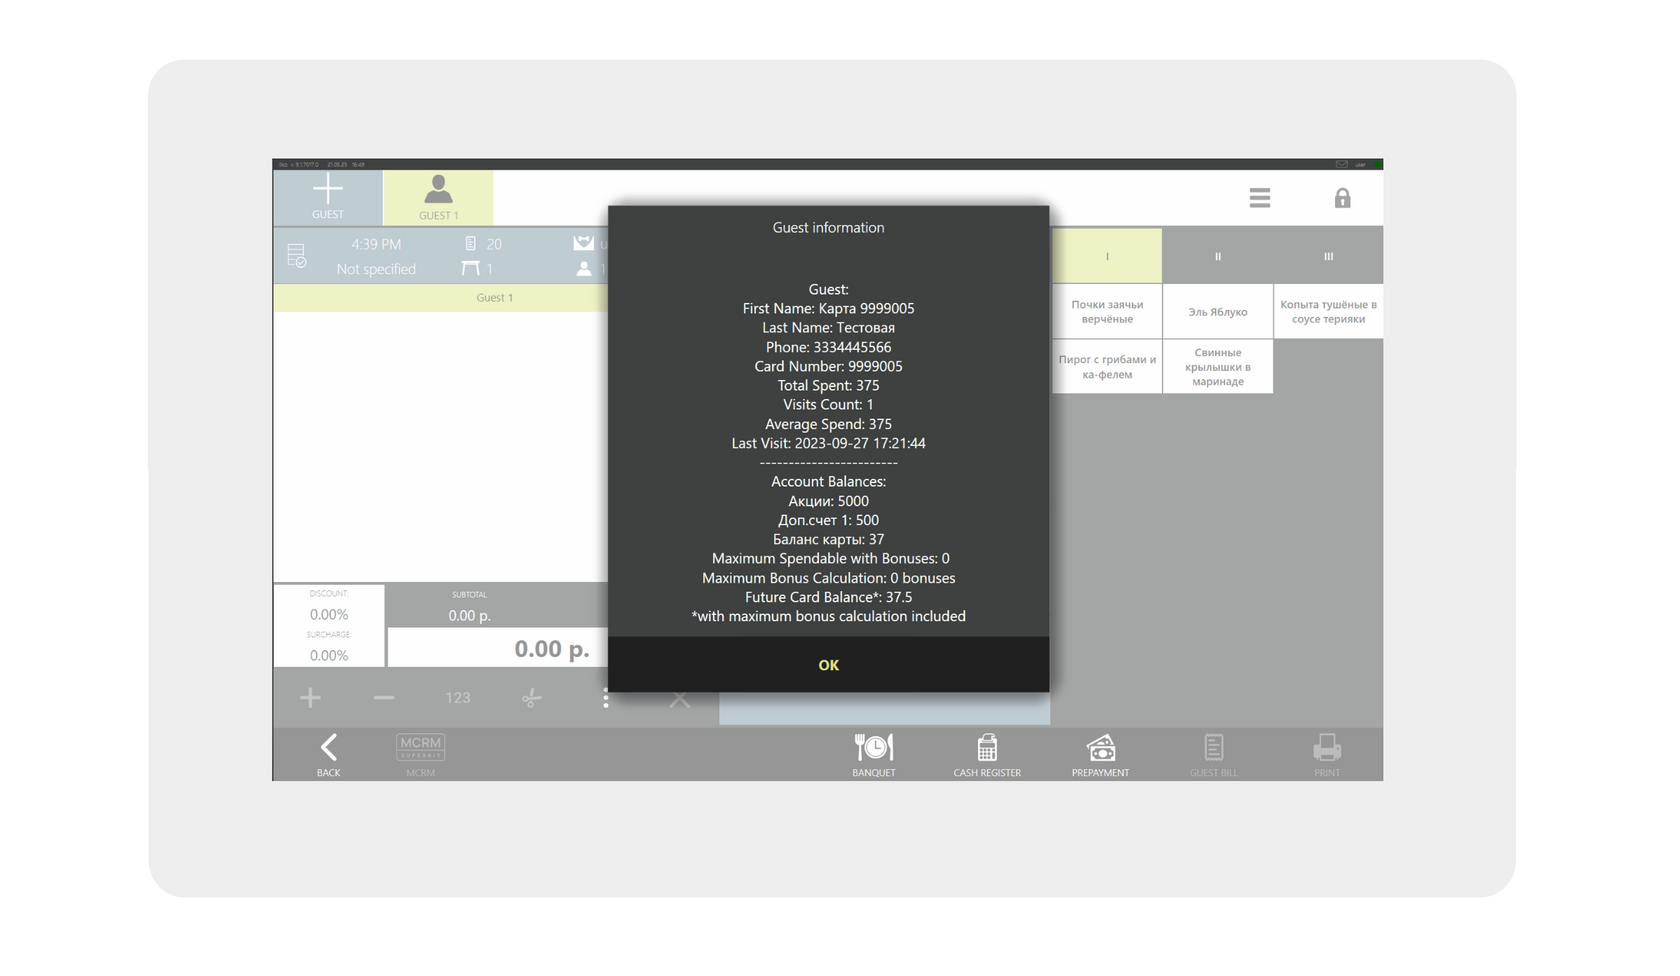
· The first block contains the client's data with statistics.
· Client's bonus account balances:
1. Card Balance - the client's main account (default, always used). Bonuses for purchases are credited to this account.
2. Promotions / Additional Account 1 (names can vary) - additional optional accounts that can be used as deposits, counters, or promotional accounts.
· Information on the bonus accrual and possible deductions for the client in this order.
· Client's bonus account balances:
1. Card Balance - the client's main account (default, always used). Bonuses for purchases are credited to this account.
2. Promotions / Additional Account 1 (names can vary) - additional optional accounts that can be used as deposits, counters, or promotional accounts.
· Information on the bonus accrual and possible deductions for the client in this order.
When "OK" is pressed, the card is added to the order.
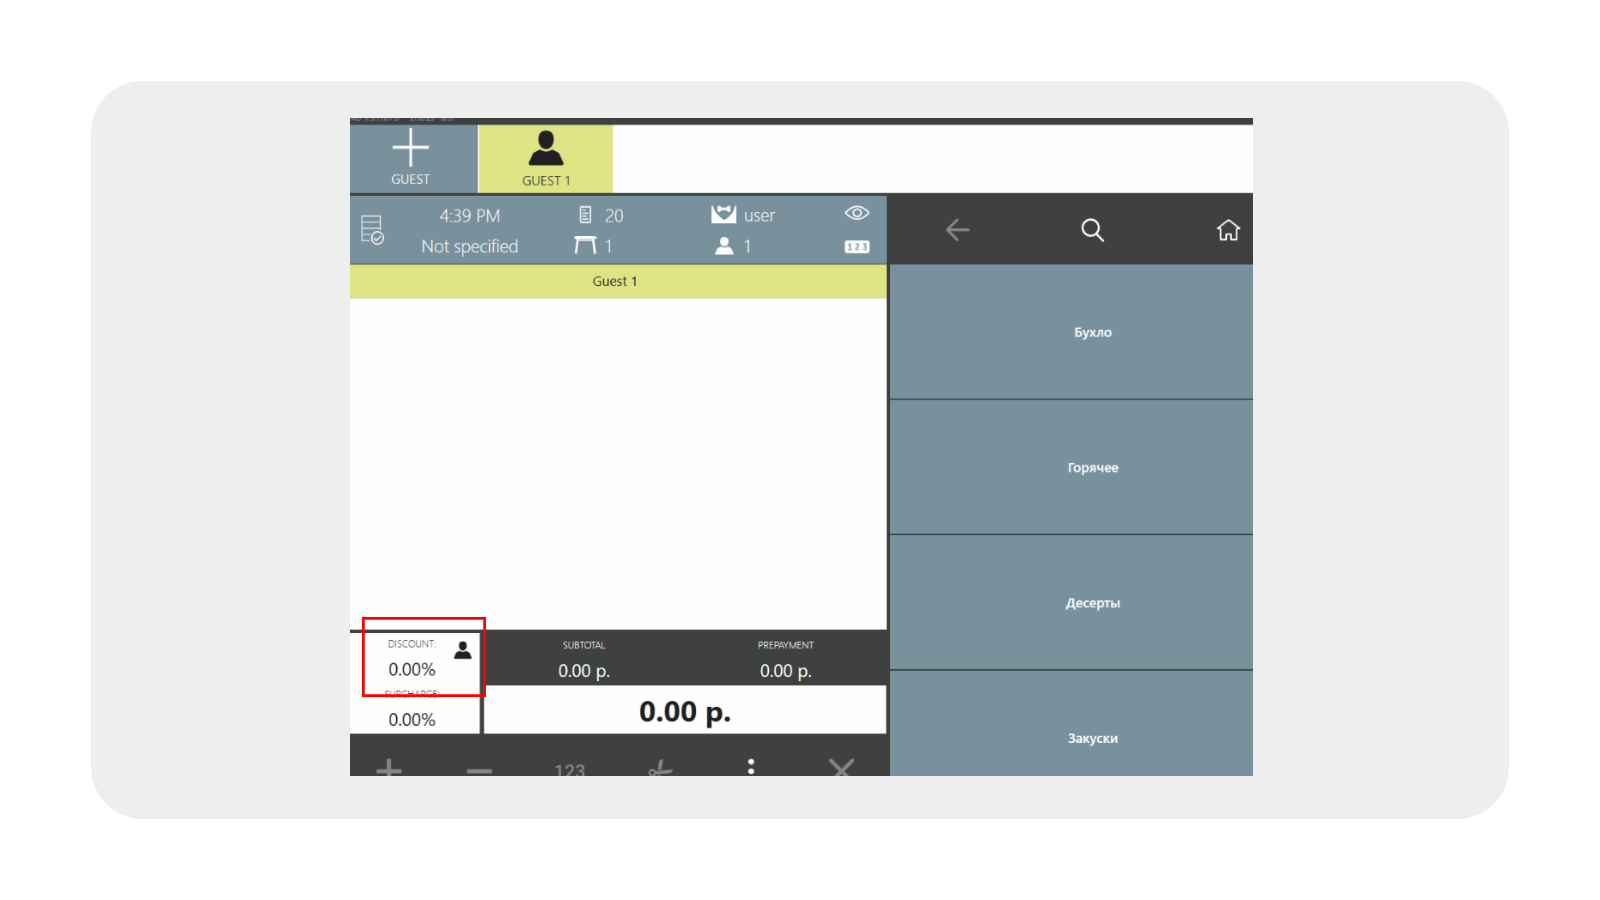
In an order with an added card via the MCRM button, you can perform the following actions:
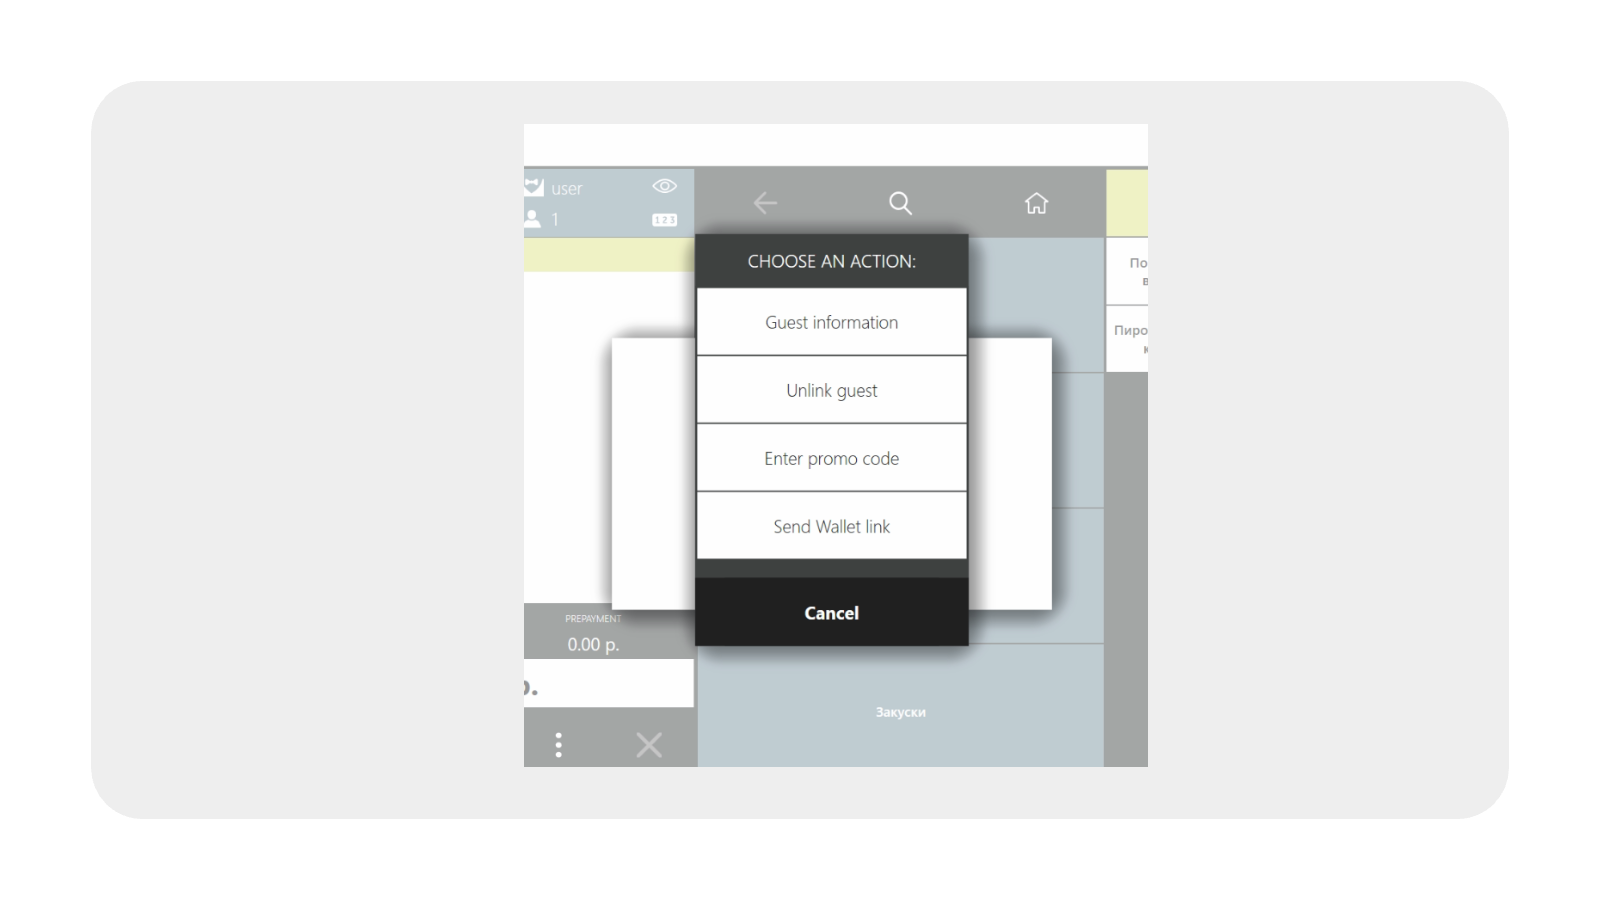
- view customer information;
- unlink the card from the order;
- enter a promo code (to add a promotional dish with a 100% discount);
- send an SMS to the customer with a link to install a personal card in the Wallet app.
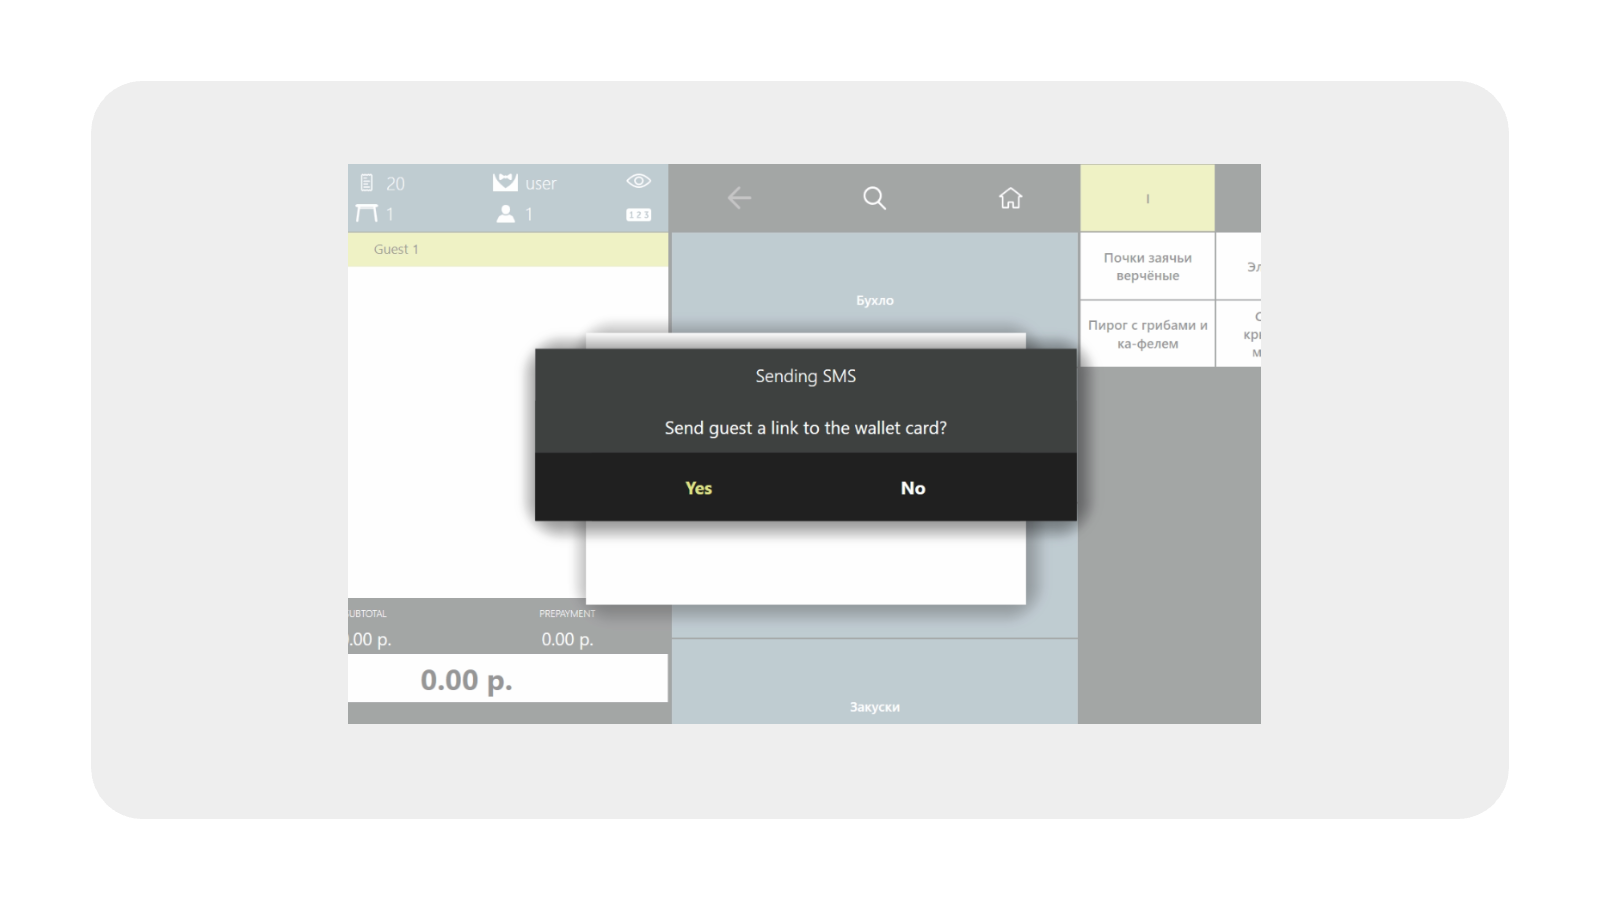
An SMS with a link to the card will be sent if the SMS channel is used in MCRM and there are sufficient funds in the company's communication balance.
Payment
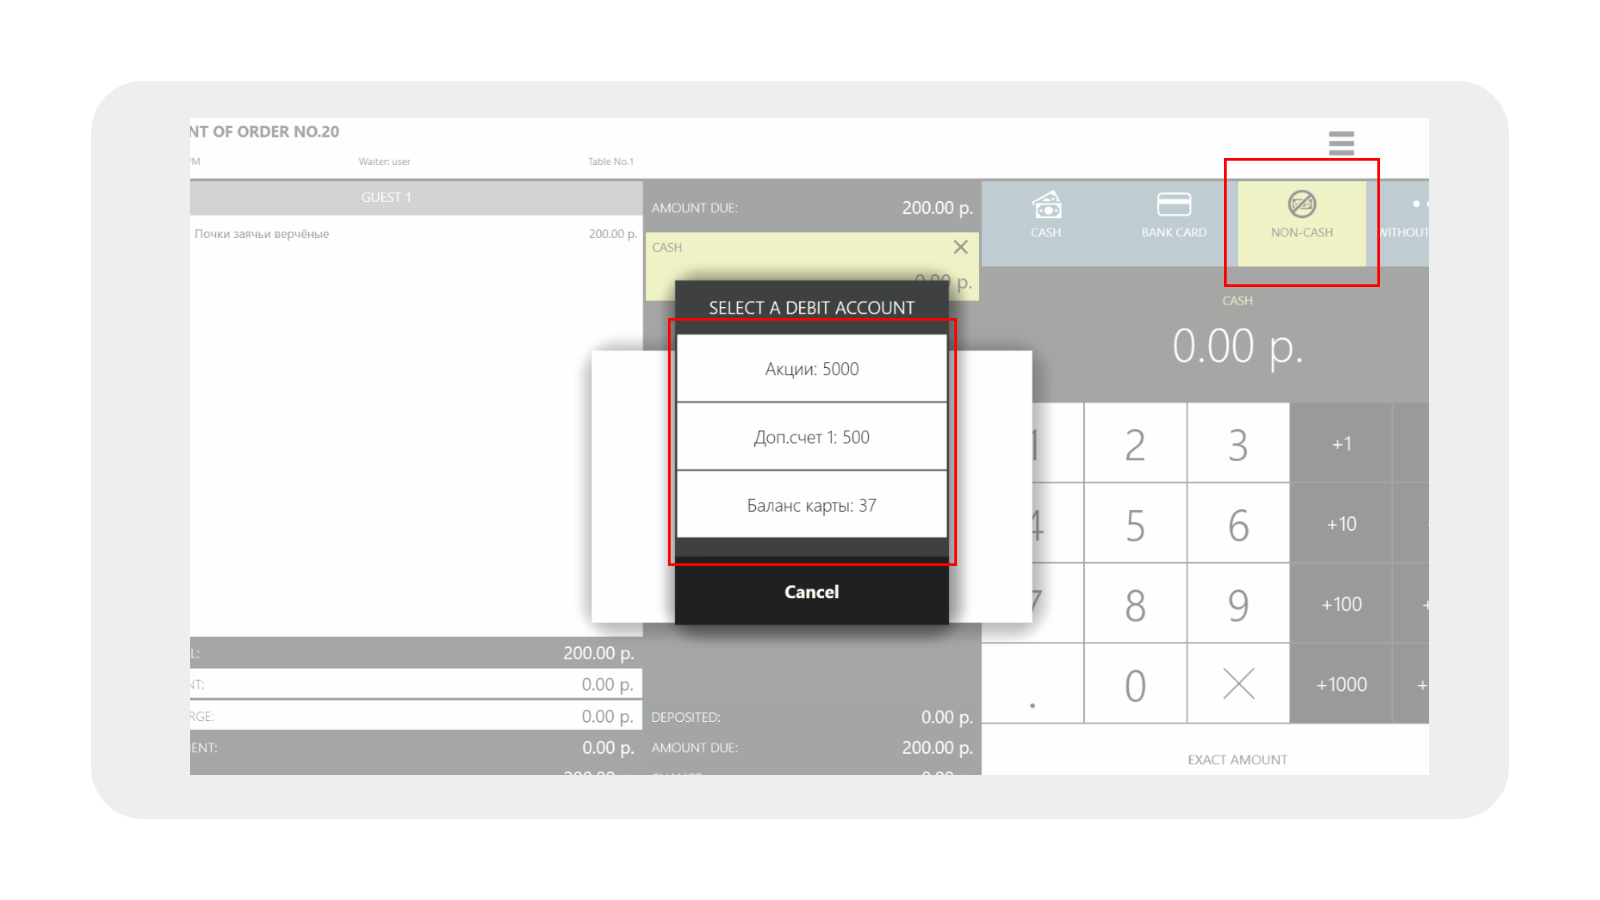
In "Cash Register" mode, select "Non-cash Payment".
Choose the bonus account for deduction. Payment with bonuses can only be made from one account.
Choose the bonus account for deduction. Payment with bonuses can only be made from one account.
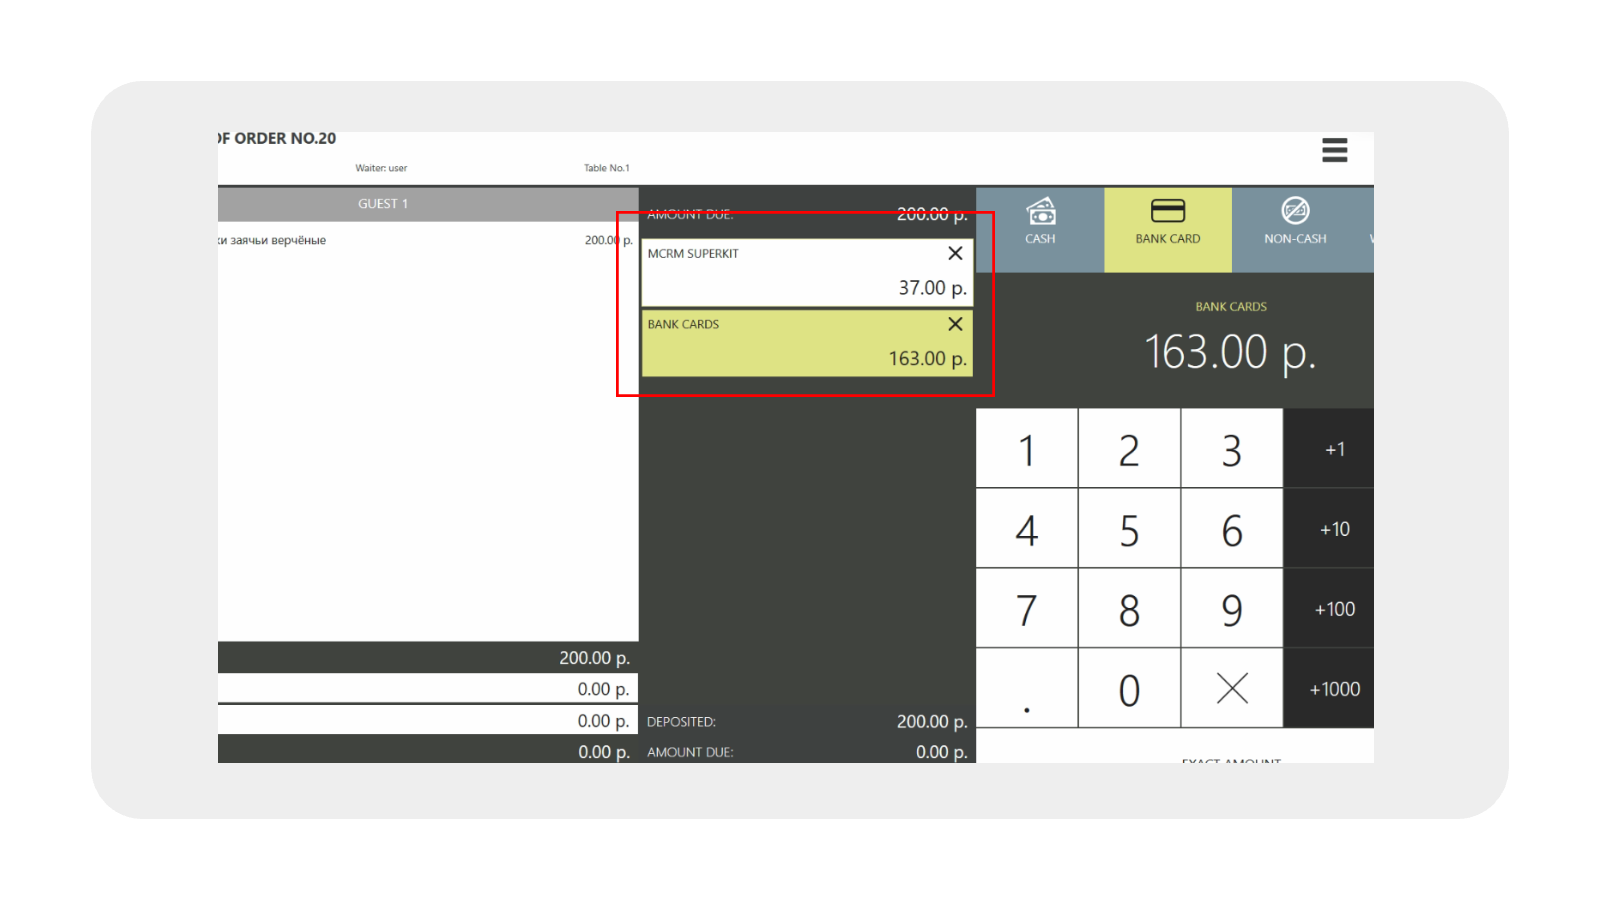
The remaining amount is covered with money using the desired payment method.
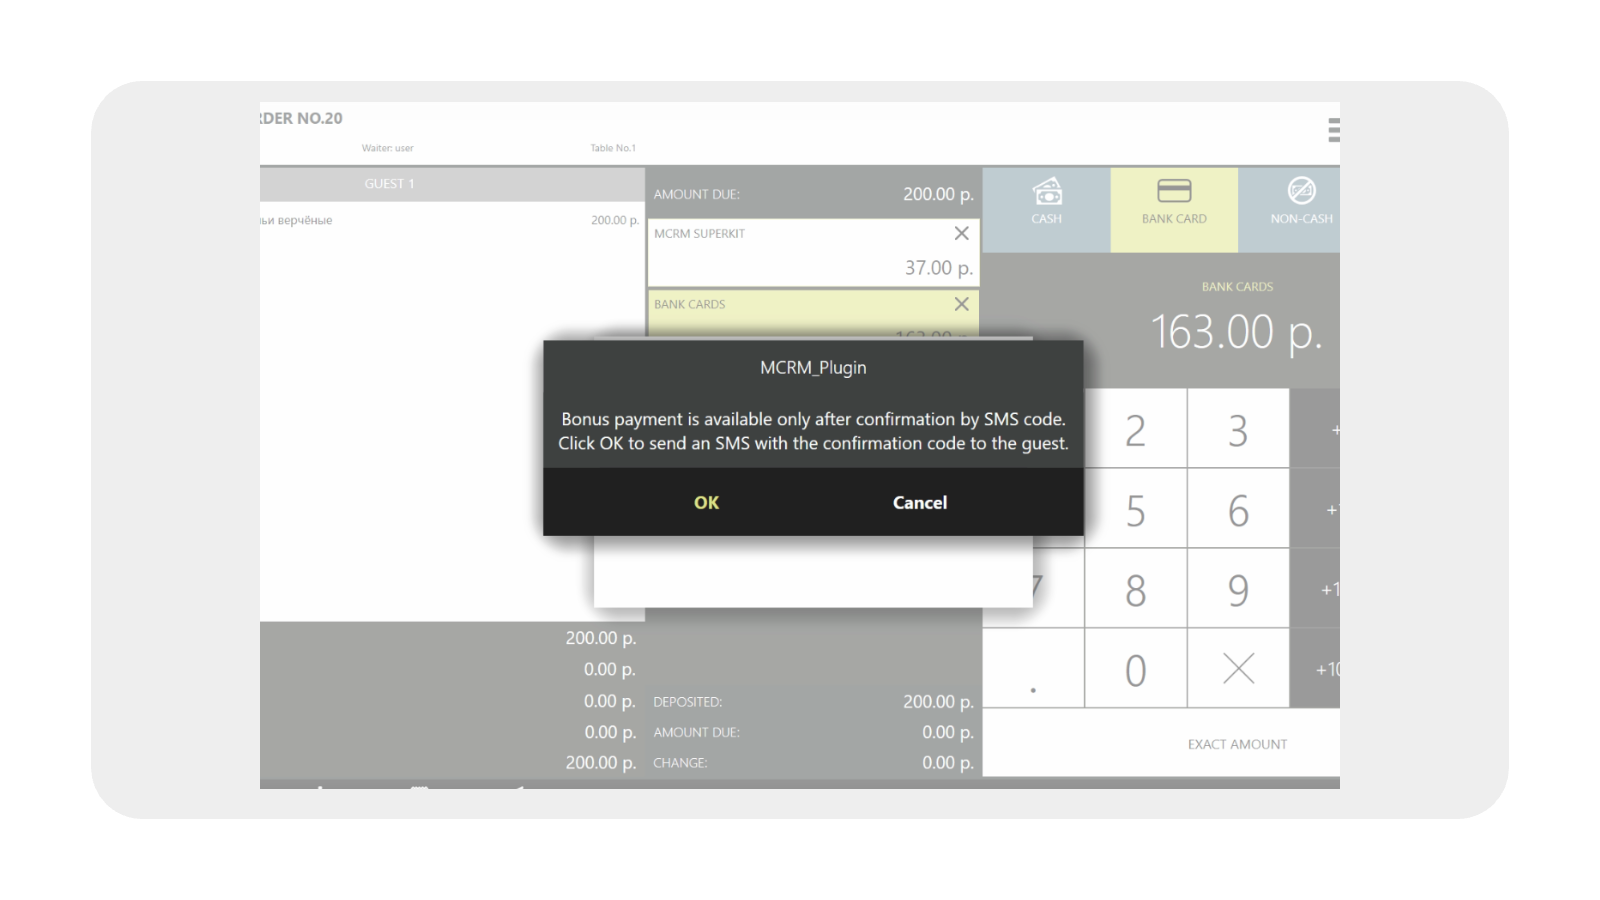
If the bonus deduction verification option is enabled, a window will appear when attempting to deduct bonuses, where you need to click "OK" to send a verification code via SMS.
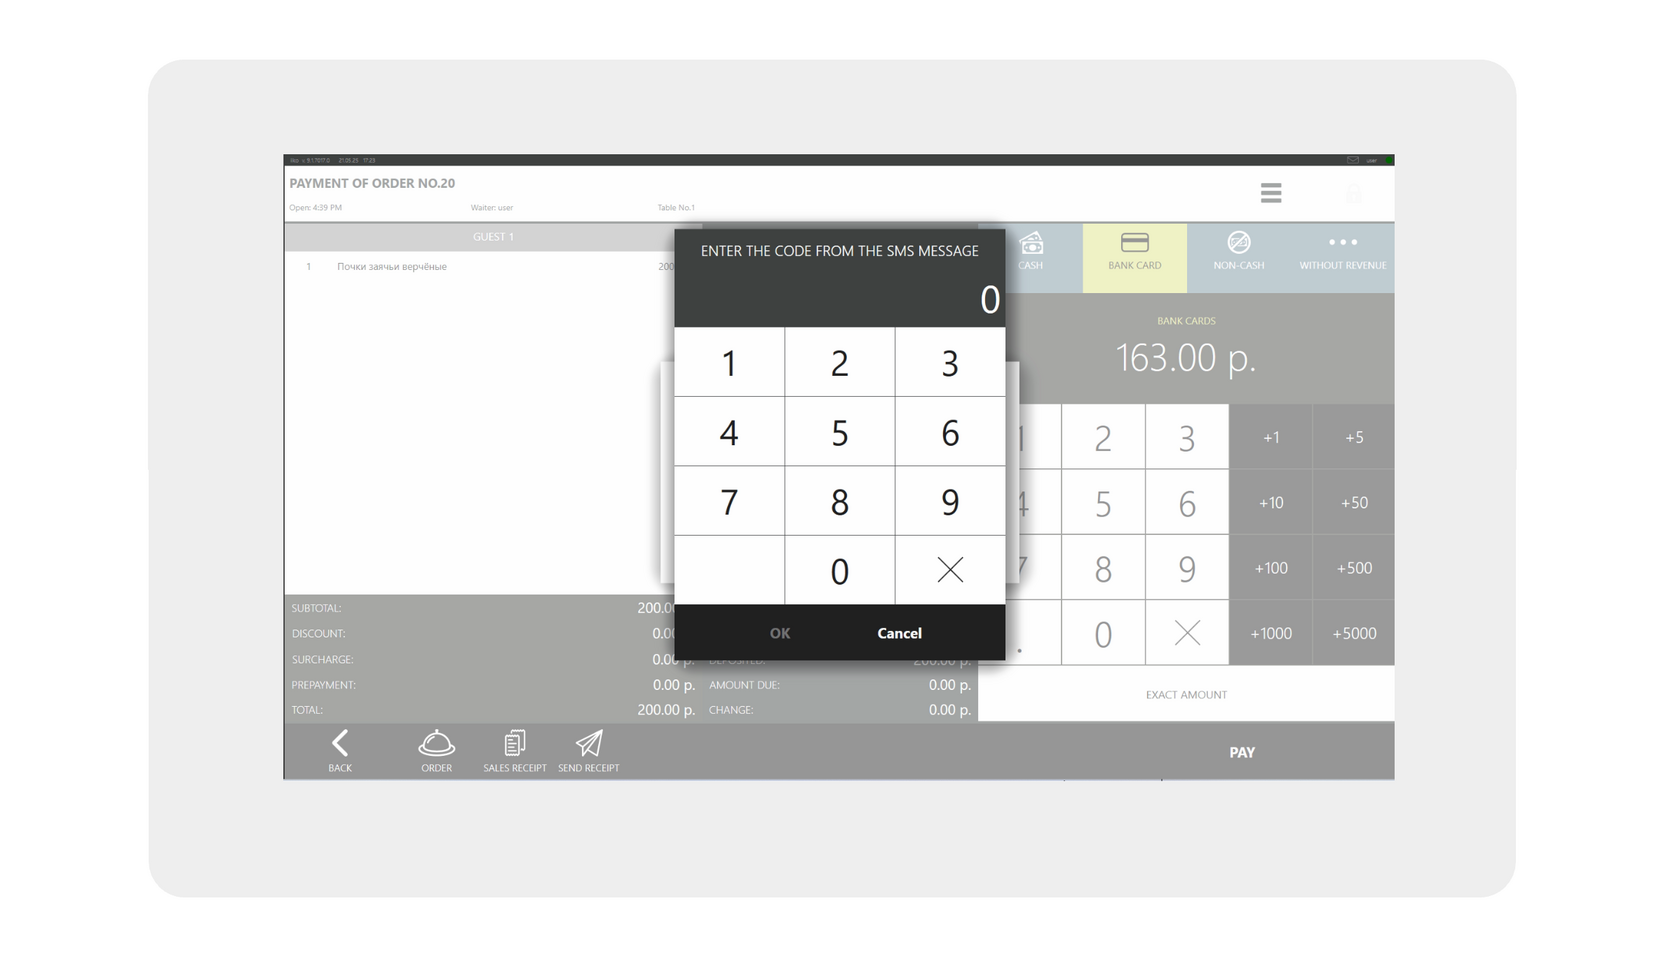
And enter the verification code.
Additions
Other features of the MCRM plugin can be found under the "Plugins" button.
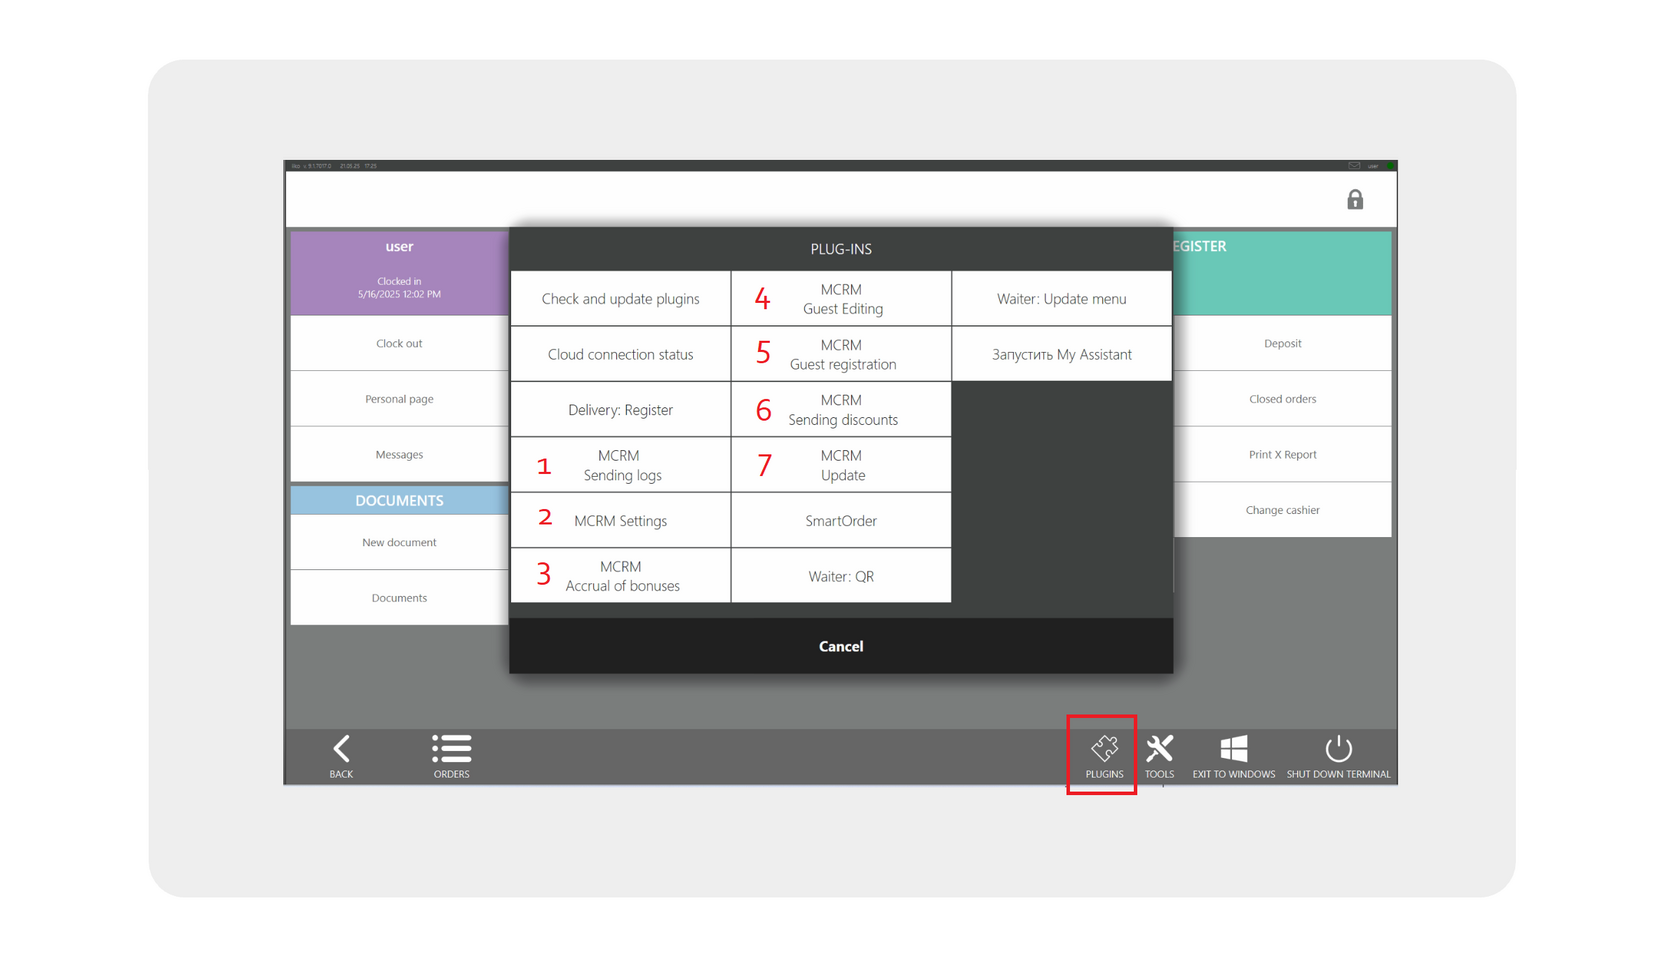
Button №1 MCRM Sending logs
Sending logs to MCRM support.
The following are sent:
The following are sent:
- api.log
- cash-server.log
- error.log
- plugin-MCRM.log
- virtual-printer.log
- MCRM_Plugin_Config.xml
Button №2 MCRM Settings
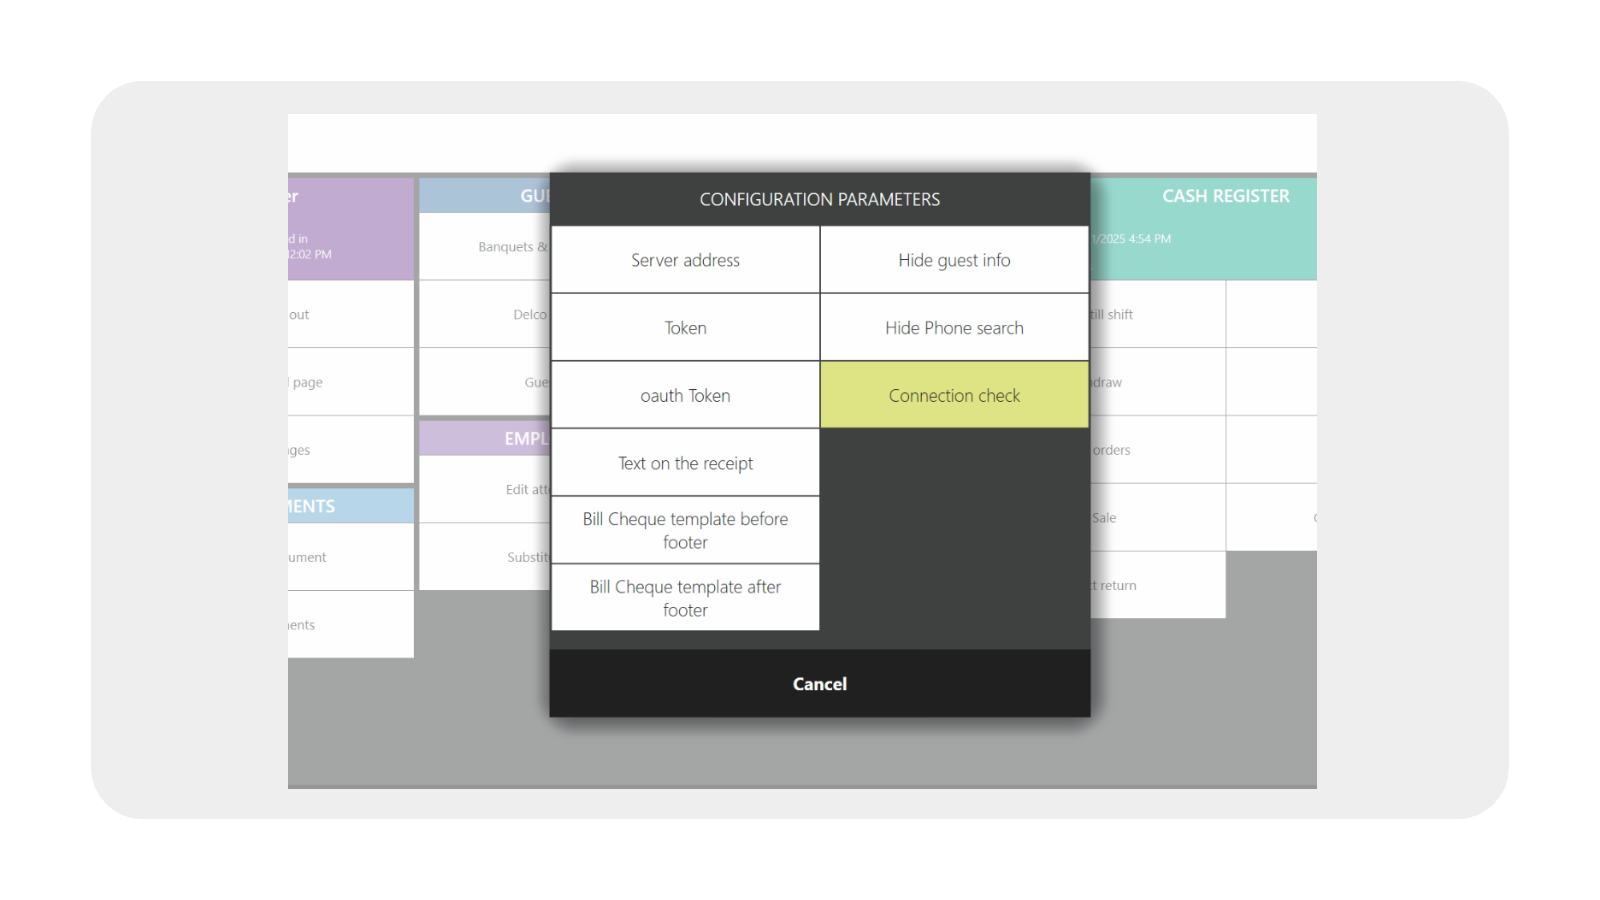
Editing the config file to configure the connection.
- Server address
- Token
- oauth Token
- Text on the receipt - adding arbitrary text for loyalty program clients.
- Bill Cheque template before footer - editing the pre-check layout, the section about MCRM loyalty.
- Bill Cheque template after footer - adding arbitrary text to the footer.
- Hide guest info - do not display personal data after check-in.
- Hide Phone search - hiding the button.
- Connection check - connection testing.
After changing the parameters, it is necessary to restart iikoFront.
Button №3 MCRM Accrual of bonuses
Crediting bonuses to the selected guest's bonus account without creating an order (manual bonus allocation).
Button №4 MCRM Guest Editing
Updating the profile data of a registered customer.
The card number, phone number, and date of birth cannot be changed.
The card number, phone number, and date of birth cannot be changed.
Before performing the editing and bonus allocation operations, it is necessary to check in the guest.
Button №5 MCRM Guest registration
Adding a new customer to the loyalty system.
Mandatory information must be entered for successful registration (required fields are marked with an *).
Mandatory information must be entered for successful registration (required fields are marked with an *).
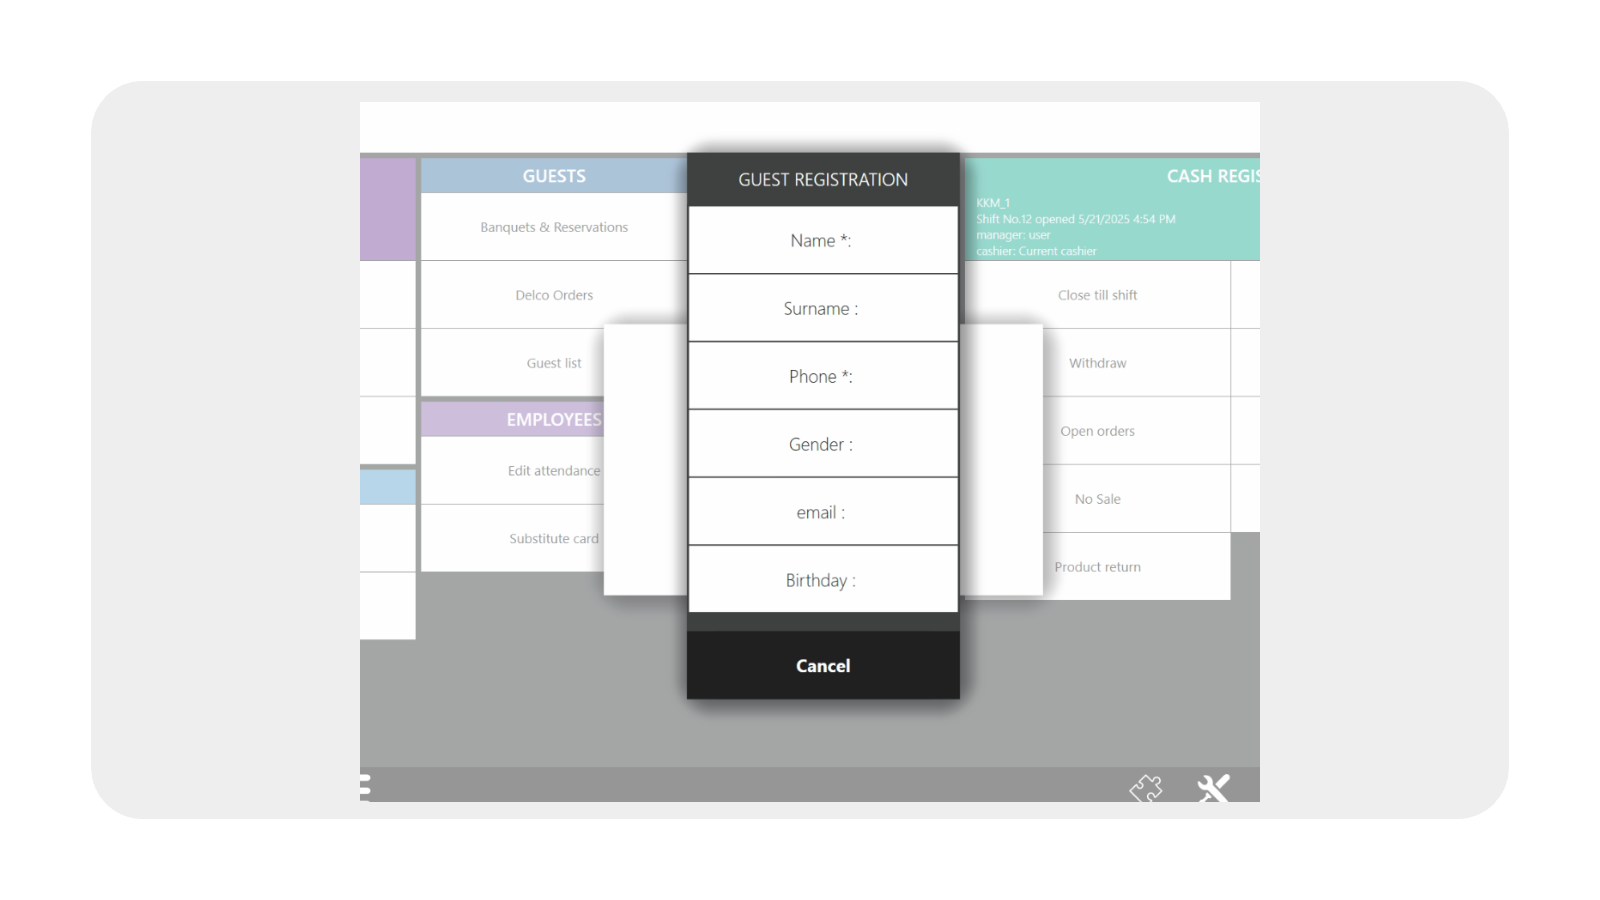
Registration is not the same as checking a customer into an order; it is specifically the creation of a new customer in the MCRM database and in your loyalty program.
Button №6 MCRM Sending discounts
Sending the discounts created in iiko to MCRM support along with their names and identifiers.
These discounts can later be assigned to customers when conducting promotional activities.
Button №7 MCRM Update
Checking for new versions of the plugin and updating to the latest version.
After changing the parameters, it is necessary to restart iikoFront.
For any questions during the setup, please contact us through Telegram.